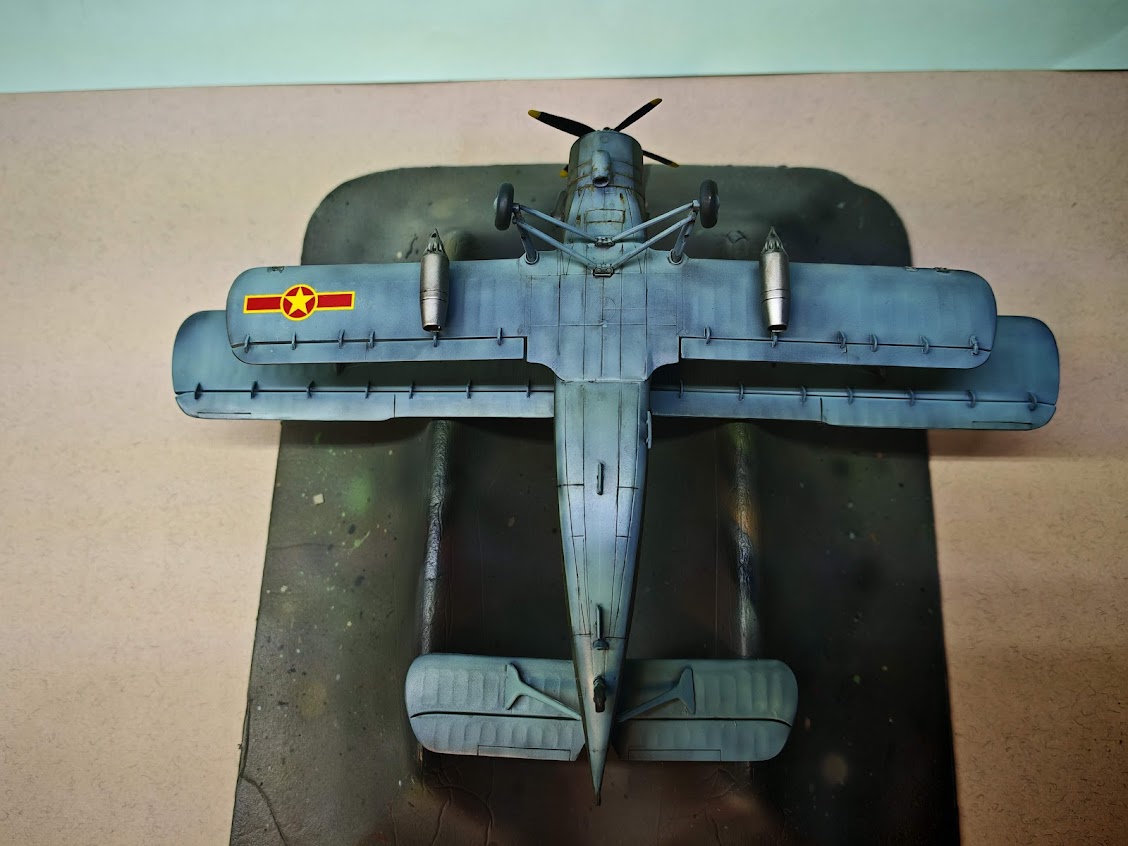
Russian tanking
Tuesday, 24 February 2026 14:45Finished, my first proper tank model in decades. This is the 1/35 Zvesda kit of the Russian T-80UD tank from 1991. The UD was for "Ukrainian Diesel", a fairly rare variant fitted with a diesel engine instead of a turbine, giving it better range and fuel consumption at the expense of speed. This one is only lightly weathered; I don’t think they were used in combat. I could be somewhat casual with airbrushing since the Russian factories were too. The Zvesda kit is not bad at all, except for terrible fit between the hull and top of the tank; I had to grind down the top of the tracks to get it to fit. The base is a cobblestone street 3D print from Fallout Models, with hand-painted cobbles, and a bit of water and dirt.


Album of display pics
Full build album
Album of display pics
Full build album
Buccaneer in the Gulf
Tuesday, 24 February 2026 14:20Finished, the Airfix 1/48 kit of the Hawker Siddeley Buccaneer S.2B. This one is Longmorn, one of the Buccaneers sent by the RAF to the Gulf War in 1991, painted with a sandy camouflage called "desert pink". They typically carried a slipper fuel tank, laser designator pod to designate targets for Tornados, an ECM pod, and a Sidewinder for self-defence. The paint wore off fast, so there was quite a bit of weathering on the aircraft, and the colour ranged from pinkish to yellowish. I used pink mottling under Mr Color’s "Flesh" paint, and I think it’s a pretty decent match; I used an entire bottle of paint. The kit itself had some poor fit issues (especially the air brake!), but detail is not too bad.
Album of display pics here (16 pics)
Full build album
AI accuracy
Tuesday, 13 January 2026 12:59A few days ago I needed to check which way the propellers rotated on my Hornet model kit, so I asked Chatgpt. It told me they rotated outward, and that the top of the blade tips rotated toward the cockpit (and it offered up an ASCII-drawn diagram that looked like a lozenge). That seemed contradictory, so I asked more questions. I was asked which kit I was building, and Chatgpt offered up some suggestions for improving the kit's accuracy - like lengthening the nose wheel. The Hornet did not have a nose wheel.
Then it talked about the clean lines, and how the tail wheel doors closed. The Hornet did not have tail wheel doors. It suggested lengthening the tail wheel so that the model would sit more nose-up. That is not how it works.
At this point I couldn't trust a single thing it was saying, so I went to other sources to check which way the propellers rotate. They rotate inward, not outward as Chatgpt said.
How much do you trust AI? I picked up those errors only because I'd been researching the aircraft.
Incidentally, I've tried Deepseek, which got the answer drastically wrong, saying the propellers are not handed, despite knowing the Hornet had different model engines on left and right.
Copilot says the props turn inward, quoting a pilot reference. Copilot is right. It got the different engines right too.
Gemini was correct too, and provided a video as reference.
I finished a really old model kit while I was on holiday: the blue-and-gold armour of Kaiser Maximilian II. I had painted the face during the year, aibrushed the armour in a dark metallic blue enamel (with a gloss coat), and spent a long, long time doing all the gold in Bright Gold. Not a fantastic result, but the gold looks good.


For Model of the Year, I also dug out the Erzherzog Siegmund armour I did many years ago, painted in Humbrol polished metal paint.

For Model of the Year, I also dug out the Erzherzog Siegmund armour I did many years ago, painted in Humbrol polished metal paint.
Bloch MB.152
Wednesday, 19 November 2025 15:45Finished. The Heller 1/72 kit of the Bloch MB.152 fighter from early WW2. An ancient kit - I built one as a kid. Not too bad though, and I completely scratchbuilt a cockpit for it. It was quite a struggle researching the colours; it seems there was very little consistency at the time. The decals were old and yellowed, so I carefully trimmed them first. The Bloch engine was slightly pointed to the left to counter torque.


Full build album here
Another old kit finished: the Airfix 1/72 Westland Whirlwind. I built one of these in 1981 in boarding school. A nice neat kit of a pretty WW2 plane. It's relaxing to build these old kits; they lack detail, but they're quick, easy builds.


Full build album here
Bloch and Whirlwind
Tuesday, 4 November 2025 16:03I'm busy with two model kits at the moment.
The first is an ancient Heller kit of a Bloch MB.152, a French WW2 fighter plane that did really badly in the early part of the war. I scratchbuilt an entire cockpit for it, and I'm busy doing the camouflage painting at the moment. One peculiarity is that the nose points left by a couple of degrees in order to counter torque. Finding accurate colours is a challenge; the French at the time were not good with documentation or consistency.


The other kit is an old Airfix Westland Whirlwind, a little twin-engined British WW2 fighter. Like the Bloch, I built one of these back in the early 80s. It's a simple kit, and I'm not doing anything fancy at all, just building it as is.


The first is an ancient Heller kit of a Bloch MB.152, a French WW2 fighter plane that did really badly in the early part of the war. I scratchbuilt an entire cockpit for it, and I'm busy doing the camouflage painting at the moment. One peculiarity is that the nose points left by a couple of degrees in order to counter torque. Finding accurate colours is a challenge; the French at the time were not good with documentation or consistency.
The other kit is an old Airfix Westland Whirlwind, a little twin-engined British WW2 fighter. Like the Bloch, I built one of these back in the early 80s. It's a simple kit, and I'm not doing anything fancy at all, just building it as is.
My current model is a Heller model of a Bloch MB.152, a Fresh fighter plane from early WW2. It's not a great kit, so I'm scratch-building a complete cockpit for it, including instrument panel. Finding the right colours to use is a challenge; French military aircraft were not consistent nor well documented, and there aren't any survivors.

Convair XFY-1 "Pogo"
Wednesday, 29 October 2025 15:18Finished, the Lindberg 1/48 XFY-1 "Pogo" VTOL aircraft. The Pogo was a weird beast, and only one pilot ever managed to successfully repeatedly fly it. The model kit was barebones, so I scratchbuilt the entire cockpit. I'm especially pleased with the bare metal and aluminum finish; I used Mr Color "Gun Chrome" for the bare metal, and it gives an excellent finish. The contra-rotating prop is geared - they actually move opposite directions.


Full album of pictures
BAe Hawk T.1
Wednesday, 29 October 2025 15:03I finished the Revell 1/72 BAe Hawk T.1 model, depicting a plane flown by 208 Squadron for their 100th anniversary in 2016. Nice kit, very detailed for the size. The all-black colour scheme is eye-catching.


Full album of pictures
September/October models
Monday, 20 October 2025 15:00I'm busy with two model kits at the moment, hoping to have them done by the model club meeting on Saturday.
One is the Revell 1/72 BAe Hawk, a little trainer aircraft. The kit was actually a birthday gift to one of the guys at the club, and he asked me to build it for him. The tricky bit is that it's all-black, which leaves limited scope for weathering and highlighting. Still, neat kit.
The other is a Lindberg 1/48 XFY-1 "Pogo". It's an old kit, with very little detail, but a super interesting subject: a weird aircraft with giant contra-rotating propellers, designed to take off vertically from a tail-sitting position. Only one pilot ever managed to take off and land with any regular success. I scratch-built the entire cockpit, and so far it's coming along nicely - lots of bare metal paint.
Along the way I tried a new substance: Gauzy Glass Coat. For years I have used Future/Pledge floor polish to dip the aircraft canopies in; it forms a clear, glossy protective coating that looks good. Gauzy supposedly replaces that, since Future/Pledge is hard to get hold of. I tried it on the Hawk canopy, and it was a mess - it left bubbles and bumps, and looked horrible. I was able to strip it off, luckily, by soaking the canopy in rubbing alcohol for a few minutes, and the canopy wasn't damaged. Back to Pledge, which works just fine. You can see the Pledge-coated canopy here:

At the last club meeting, I bought a few really old model kits, of interesting aircraft. I seem to make a habit of building ancient, rubbish kits, and making them look nice. Maybe my next one up will be the old Heller model of a French WW2 fighter, the Bloch MB.152.
One is the Revell 1/72 BAe Hawk, a little trainer aircraft. The kit was actually a birthday gift to one of the guys at the club, and he asked me to build it for him. The tricky bit is that it's all-black, which leaves limited scope for weathering and highlighting. Still, neat kit.
The other is a Lindberg 1/48 XFY-1 "Pogo". It's an old kit, with very little detail, but a super interesting subject: a weird aircraft with giant contra-rotating propellers, designed to take off vertically from a tail-sitting position. Only one pilot ever managed to take off and land with any regular success. I scratch-built the entire cockpit, and so far it's coming along nicely - lots of bare metal paint.
Along the way I tried a new substance: Gauzy Glass Coat. For years I have used Future/Pledge floor polish to dip the aircraft canopies in; it forms a clear, glossy protective coating that looks good. Gauzy supposedly replaces that, since Future/Pledge is hard to get hold of. I tried it on the Hawk canopy, and it was a mess - it left bubbles and bumps, and looked horrible. I was able to strip it off, luckily, by soaking the canopy in rubbing alcohol for a few minutes, and the canopy wasn't damaged. Back to Pledge, which works just fine. You can see the Pledge-coated canopy here:
At the last club meeting, I bought a few really old model kits, of interesting aircraft. I seem to make a habit of building ancient, rubbish kits, and making them look nice. Maybe my next one up will be the old Heller model of a French WW2 fighter, the Bloch MB.152.
Blackhawk Done
Wednesday, 3 September 2025 13:15The Minicraft 1/48 model kit of the MH-60K Blackhawk Special Operations, the only Blackhawks actually painted black (which faded). It was a terrible kit - fit was poor, few locating pins, and even the colour directions and decals were wrong in multiple ways. For example, it showed it in olive drab colours - except the SO versions were black. I did it with a black primer, then a greenish highlight colour for the black-basing, then RLM66 dark grey, with a light overspray of black over it.


Full album
Full album
The Pink Tank
Wednesday, 3 September 2025 13:05I finished my model of a historically accurate pink tank. This is the legendary "Pink Tank" as of 2011 in Prague. It was a Revell 1/72 IS-2 kit, nice and easy to do, with a 3d-printed finger. I've included a pic of the real thing.

Full album
Egg Harrier
Wednesday, 13 August 2025 14:50I've been quite slow on modelling, but I recently finished an "egg plane" model, an aircraft shaped like an egg: a Hasegawa "RAF Taxi" Harrier, along with a ground scene including an old codger and his got waiting for the bus or taxi. It was a really old kit, and quite fun, but I had to find replacement decals because the old ones were welded to the paper.


All the build pictures
CMC Leopard
Friday, 4 April 2025 15:56Finished, the CMC Leopard model kit, a 1/72 scale Amodel kit. It's tiny! The CMC Leopard was a British 4-seater passenger jet with two engines, and was significantly smaller than a Me-109 or Cessna 172. It first flew in1988. A nice simple kit, though it didn't fit together well. I tried a new clearcoat, Mr Color GX110. Very nice indeed, better than even the normal clearcoat.


Full album here.
Full album here.
Fw-189 Uhu
Friday, 4 April 2025 15:49Finished, my Focke-Wulf Fw-189 Uhu, a 1/72 scale Italeri kit. This plane was in the WW2 Winter War, and was painted with a whitewash in the winter. The whitewash would wear off or be rubbed off where needed.
I also made a base for it, with snowdrifts and snow on bushes, using snow powder and wood glue.
I built the kit with normal green camouflage with lacquer Mr Color paints, and then applied an acrylic Army Painter over it, and then weathered and rubbed it away with water where needed. That stuff is awful to airbrush with. Lots of mud too, especially where crew would walk (inside as well!)
Anyway, I learnt a lot through the process, and picked up new techniques. Definitely need to work on my canopy masking though. I had some annoying residue on the panes of glass.
Complete album is here.
Arado Ar-234 C-2
Wednesday, 26 February 2025 15:49I finished my Arado Ar-234 C-2 model kit last week, in time for the model club meeting. It's an ancient Revell kit, with poor fit and detail, and raised panel lines. I scratchbuilt the entire cockpit, did some post-shading on the panel lines, and used a spare set of Luftwaffe decals to get the Tesla logo for the tail. The C-2 model was designed to launch the V-1 flying bomb, and only one was ever made.


Link to full album
Link to full album
I finished my model of the Avro Canada VZ-9 Avrocar, along with a couple of 3d-printed visitors looking for transport home. Likely the smallest 1/72 model jet I've ever made. This was a real aircraft (but it did not fly well); it was made in the 1950s, and the service ceiling was a lofty 3 feet, much lower than the design called for! This example is on display in the Smithsonian Museum.


Full album here: Avrocar
Model of the Year
Monday, 23 December 2024 16:13I entered about 18 models in the Gold Reef Scale Modellers' Model of the Year show on 7 December, almost all being models I'd built this year. I think there were a total of about 170 models entered by about 30 members. A local N-gauge model railway group joined us, and they set up some amazing displays on the stage of the school that was the venue.
The foyer had a huge D-Day diorama, really brilliant work. Judging was pretty straightforward, and everyone who entered had to judge. Judging didn't get into technical nitty-gritty; that can get quite acrimonious. There are a whole bunch of categories, so different scales and types of aircraft, armour, cars, ships, figurines, and other stuff.
Anyway, the models I really wanted to win, my Airfix Gannet and my Saab Viggen, sadly didn't. :( However, I did win in 5 different categories:
My De Havilland Sea Vixen won in the 1/72 Military Jets category; it's a big category, so that was cool.

My recently-completed Antonov An-2 won in the 1/48 & Smaller Biplanes category; I was pleased about that. Its the one in front of the centre placard.

The Soul Huntress won the Fantasy and SciFi 75-90mm Figures category. Admittedly the only entry in that category, so I was bound to win it. :)

My Edgely Optica won the 1/72 Scale Civilian Propeller Aircraft category. Only entrant in that category, oddly.

And, biggest surprise of all, my Ekranoplan A-90 Orjanok won the 1/144 Scale Military Propeller Aircraft category. I built this model like 25 years ago, brush painted and all, and it somehow won.

Prizes were assorted vouchers for hobby stores.
Along with all the models, I also built bases for most using picture frames, and sandpaper (painted, weathered, and with lines) as tarmac. It was quite a mission getting all the models there and back in my car. Even with my car's boot full, I had models in the front.

The overall show winner was Arthur's samurai horseman. Arthur is club chairman, and his absolutely amazing figurine work often wins the show. This samurai is just incredible. You have no idea how complex it is; there are knots in the bowstring, the horse is the correct breed and colouring, and all the tassels on the horse started out as flat white metal pieces, he had to put them in motion.

There was an "Open Category" for non-club-members to enter. Winner of that category was this, by one of the railway people:


Here's a link to a full album of pics I took randomly: MOY 2024
The foyer had a huge D-Day diorama, really brilliant work. Judging was pretty straightforward, and everyone who entered had to judge. Judging didn't get into technical nitty-gritty; that can get quite acrimonious. There are a whole bunch of categories, so different scales and types of aircraft, armour, cars, ships, figurines, and other stuff.
Anyway, the models I really wanted to win, my Airfix Gannet and my Saab Viggen, sadly didn't. :( However, I did win in 5 different categories:
My De Havilland Sea Vixen won in the 1/72 Military Jets category; it's a big category, so that was cool.
My recently-completed Antonov An-2 won in the 1/48 & Smaller Biplanes category; I was pleased about that. Its the one in front of the centre placard.
The Soul Huntress won the Fantasy and SciFi 75-90mm Figures category. Admittedly the only entry in that category, so I was bound to win it. :)
And, biggest surprise of all, my Ekranoplan A-90 Orjanok won the 1/144 Scale Military Propeller Aircraft category. I built this model like 25 years ago, brush painted and all, and it somehow won.
Prizes were assorted vouchers for hobby stores.
Along with all the models, I also built bases for most using picture frames, and sandpaper (painted, weathered, and with lines) as tarmac. It was quite a mission getting all the models there and back in my car. Even with my car's boot full, I had models in the front.
The overall show winner was Arthur's samurai horseman. Arthur is club chairman, and his absolutely amazing figurine work often wins the show. This samurai is just incredible. You have no idea how complex it is; there are knots in the bowstring, the horse is the correct breed and colouring, and all the tassels on the horse started out as flat white metal pieces, he had to put them in motion.
There was an "Open Category" for non-club-members to enter. Winner of that category was this, by one of the railway people:
Here's a link to a full album of pics I took randomly: MOY 2024
Antonov An-2
Tuesday, 3 December 2024 15:33I finished the Antonov An-2 model kit, Italeri 1/72. It was/is the largest single-engined biplane in the world, with an 18m wingspan! This one is in the markings of North Vietnam. Not a great kit, and I had to fabricate a missing bit of cockpit glass. I did learn the use of oil paints for oil leaks and weathering, and doing the wire rigging was interesting (lots of tiny holes to drill!)


Full album here
Full album here
Finished, my Italeri 1/48 Saab AJ-37 Viggen. It was a rubbish kit, and the masking was a nightmare (and my paintwork could have been better), but it came out looking pretty decent. The "fields and meadows" camouflage is iconic. Bonus pic of my 35 or 40 year old Matchbox kit. I took the Viggen to the scale modellers' club on Saturday, and it got lots of attention and interest.
The Saab Viggen was a Cold War interceptor/fighter-bomber. The AJ-37 version I did is the fighter bomber, and it could carry a whole collection of rockets, fuel tanks, air to ground missiles, and air to air missiles, and more. The Viggen is the only aircraft ever to get a missile lock on the legendary SR-71 Blackbird
.
Full link to progress pics album here.


Alongside the 1/72 scale Matchbox Viggen I built probably in the late 80s. Back then I thought gloss varnish looked great, and of course it was rather amateurish. I had painted the camouflage by hand with a paintbrush, no masks.


The Saab Viggen was a Cold War interceptor/fighter-bomber. The AJ-37 version I did is the fighter bomber, and it could carry a whole collection of rockets, fuel tanks, air to ground missiles, and air to air missiles, and more. The Viggen is the only aircraft ever to get a missile lock on the legendary SR-71 Blackbird
.
The first colour I did was the light green. I printed templates I'd downloaded, marked every colour on the template with a number, then using a scalpel, used the template to cut masking tape laid on a cutting mat, and masked the green piece by piece. Then I used a clear coat (theoretically to help seal the masking tape, though it didn't work with the first tape I used), black base, tan, and then the next colour, brown. I repeated for the black green, and finally did the olive green.
When I pulled all the tape off, I found a lot of bleeding under the light green tape, so I carefully masked around the affected areas, and gently resprayed and blended those bit (and had to add a brown I missed, and a brown I'd done wrong). I did a bit of post-shading (first time I've done it!) to bring back some of what was lost by the respraying. Then gloss coat, decals, a bit of panel lines (most lines were raised, sadly), and a matt coat.
In retrospect, I would have started with the smallest colours first (brown and black green), and left the big areas of light green for last. I would also have used the good masking tape first, LOL.
Full link to progress pics album here.
Alongside the 1/72 scale Matchbox Viggen I built probably in the late 80s. Back then I thought gloss varnish looked great, and of course it was rather amateurish. I had painted the camouflage by hand with a paintbrush, no masks.
I was hoping to have my Saab Viggen AJ37 model kit ready for the model club meet at the end of November, but I ran out of time. I should have it ready for October. The camouflage and masking is really complex.
I have done the underside in grey, and the black-basing and the first light green colour on the top. I need to mask and spray the next 4 colours.


I spent a while trying to get the right colours. The light green in the "fields and meadows" camouflage scheme is supposed to match Mr Color C27 Cockpit Green, except that Cockpit Green looks way to yellow to me. It also changes depending on the colour of the paint underneath - greener if black, yellower if grey. So I found another green that seems like a more reliable match.

I have done the underside in grey, and the black-basing and the first light green colour on the top. I need to mask and spray the next 4 colours.
I spent a while trying to get the right colours. The light green in the "fields and meadows" camouflage scheme is supposed to match Mr Color C27 Cockpit Green, except that Cockpit Green looks way to yellow to me. It also changes depending on the colour of the paint underneath - greener if black, yellower if grey. So I found another green that seems like a more reliable match.
This month's model is an Italeri 1/48 scale Saab Viggen jet. I'm going to be doing it in the classic and stunning splinter camouflage; it's going to be a challenge! The kit itself is not great; poor fit, raised panel lines, and other annoyances.
Here's the cockpit. the seatbelts and instruments are all decals:

Here's where I am with the plane itself. Lots more filling and sanding to be done, but most of the assembly is complete.

Here's the cockpit. the seatbelts and instruments are all decals:
Here's where I am with the plane itself. Lots more filling and sanding to be done, but most of the assembly is complete.
So last month George at the model club has a workshop on doing decals on models, and how to make them look good. There are various decal setting solutions - Mr Setter, Mr Solver, Microset, Microsol, etc.- that help, but I've found some can mark the paintwork, and they're not perfect. George's method is a hair dryer: it heats the decals so that the decal moulds itself to the plastic beneath it perfectly, no solutions needed.
I tried it with my Gannet models, and wow, it looked good.
Here's the hair dryer I bought for R128 ($7.15):

Here you can see the result. This is a zoomed-in pic of the bottom of the Gannet, with three decals there: the rectangle and "R", the dot and "BT", and the two squares ("Sling point"). All have decal film around them and in the centre of the rectangles, but you can see how the decal film around the oblong inside the R rectangle is invisible, and the decal at the sling point has moulded itself to the sunken rivets. Pretty amazing; no silvering at all.
I tried it with my Gannet models, and wow, it looked good.
Here's the hair dryer I bought for R128 ($7.15):
Here you can see the result. This is a zoomed-in pic of the bottom of the Gannet, with three decals there: the rectangle and "R", the dot and "BT", and the two squares ("Sling point"). All have decal film around them and in the centre of the rectangles, but you can see how the decal film around the oblong inside the R rectangle is invisible, and the decal at the sling point has moulded itself to the sunken rivets. Pretty amazing; no silvering at all.
Frog Gannet
Monday, 2 September 2024 14:24To go with the amazing Airfix Gannet, I did the worst Gannet kit in the world at the same time, the decades-old Frog 1/72 Gannet in Kriegsmarine markings. No cockpits, just heads (I painted the pilot heads), and no wheel wells, I just painted them. All of 27 parts. It came out quite well though.
Here's a link to the full photo album for both Gannets.


Here's a link to the full photo album for both Gannets.
Airfix Gannet
Friday, 2 August 2024 14:09I finished my Airfix 1/48 Fairey Gannet AS.4 model kit, probably the best Gannet kit available. What a superb kit, but so complex, with hundreds of steps and decals. I learnt some new things on this one, particularly with decals. A very enjoyable kit to build, and I think it came out pretty well. The Gannet really must be one of the most beautiful aircraft ever made. 😉
There were 168 steps in the instruction booklet, hundreds of decals (40 on the weapons, 13 on the canopies, and dozens of tiny ones all over the place), and hundreds of parts.
Here's a link to the full photo album for both Gannets.


There were 168 steps in the instruction booklet, hundreds of decals (40 on the weapons, 13 on the canopies, and dozens of tiny ones all over the place), and hundreds of parts.
Here's a link to the full photo album for both Gannets.
Black basing demo
Wednesday, 31 July 2024 11:58I did a demo of the black-basing technique at the monthly model club meeting on Saturday. I'm sure there are others there who can do it better, but I volunteered and took all my equipment in.
The technique is pretty simple. The idea behind it is (especially with military aircraft and equipment) to make the surfaces look less perfect and even. You want to provide a slightly weathered or used look, with some irregularity in the paint surface. Many modellers use a method called "pre-shading" where they spray darker paint on the areas where there are panel borders, followed by the main colour, but to my eye it often looks too emphasised and unrealistic.
So what I do is paint the entire surface with a black paint (I use Mr Surfacer Black 1500, which is a bit of a primer). The in the areas between the panel lines, I use Tan paint in mottled patterns, so that it looks irregular. Then I use the final colour, laying it down in thin coats till most of the black and tan are gone. How thick it's laid down will determine how worn it looks. If it's a thin coat, it looks more worn, and thicker will look cleaner, smoother, and newer.
For camouflage, I do the whole area (like the wing), then mask off the areas I want to keep in the original colour (like brown), and re-do the black-basing process with the next colour (like green).
Here was the final result of the demo. I did the lower wing in a blue-grey; the right hand side had a thicker coat, while the left hand side looks rougher. Same with the camouflaged top wings.

The demo was pretty well received, I think, and it came out better than many of my actual models do.
The technique is pretty simple. The idea behind it is (especially with military aircraft and equipment) to make the surfaces look less perfect and even. You want to provide a slightly weathered or used look, with some irregularity in the paint surface. Many modellers use a method called "pre-shading" where they spray darker paint on the areas where there are panel borders, followed by the main colour, but to my eye it often looks too emphasised and unrealistic.
So what I do is paint the entire surface with a black paint (I use Mr Surfacer Black 1500, which is a bit of a primer). The in the areas between the panel lines, I use Tan paint in mottled patterns, so that it looks irregular. Then I use the final colour, laying it down in thin coats till most of the black and tan are gone. How thick it's laid down will determine how worn it looks. If it's a thin coat, it looks more worn, and thicker will look cleaner, smoother, and newer.
For camouflage, I do the whole area (like the wing), then mask off the areas I want to keep in the original colour (like brown), and re-do the black-basing process with the next colour (like green).
Here was the final result of the demo. I did the lower wing in a blue-grey; the right hand side had a thicker coat, while the left hand side looks rougher. Same with the camouflaged top wings.
The demo was pretty well received, I think, and it came out better than many of my actual models do.
German July - Focke-Wulf Fw-190C V-16
Monday, 29 July 2024 18:14This model is of the Focke-Wulf Fw-190C prototype V-16. The original Fw-190A was unbeatable when it appeared in the skies in 1941, but it suffered a bit at higher altitudes, and when the RAF introduced the Mk IX Spitfire with two-stage supercharger, it had a problem. The BMW 801 engine in the A was not really suitable for good supercharging, so Focke-Wulf experimented with this version, the C, with a supercharged Daimler-Benz DB603 engine and pressurised cockpit. The V-16 was the last prototype, and it didn't really go any further, with development rather going to the Jumo 213-engine D model.
This kit is a Planet Models 1/72 kit in resin with white metal undercarriage and vacuform canopy. Resin is not fun to work with, and needs superglue, which doesn't always glue things too well (except fingers). It's an unusual subject though, and came out decently enough.
Here's a link to the full album for all three models


The cockpit here is the one on the right:

This kit is a Planet Models 1/72 kit in resin with white metal undercarriage and vacuform canopy. Resin is not fun to work with, and needs superglue, which doesn't always glue things too well (except fingers). It's an unusual subject though, and came out decently enough.
Here's a link to the full album for all three models
The cockpit here is the one on the right:
German July - Swiss Me-109G-6
Monday, 29 July 2024 16:07The second of my three German aircraft is this one: A Messerschmitt Me-109G-6 in service with the Swiss air force. The Swiss bought or acquired a bunch from Nazi Germany.
The model is a Fujimi 1/48 kit. I bought it second-hand for R200, and it came two (mostly) two sets of decals. Unfortunately, one set was welded to the decal paper, and wouldn't come off. The other set were old and yellow, and also pretty fragile. I figured they wouldn't look good, so I masked and airbrushed the Swiss markings, and I found aircraft numbers (the 706) in my collection of spare decals, and I made the J - out of an O and an I. The mottling on the side, like the other two planes, was done by hand with my airbrush, and this Me-109 has four different colours of mottling.
Here's a link to the full album for all three models


The instrument panel is on the left, and the cockpit is the one on the left:


The model is a Fujimi 1/48 kit. I bought it second-hand for R200, and it came two (mostly) two sets of decals. Unfortunately, one set was welded to the decal paper, and wouldn't come off. The other set were old and yellow, and also pretty fragile. I figured they wouldn't look good, so I masked and airbrushed the Swiss markings, and I found aircraft numbers (the 706) in my collection of spare decals, and I made the J - out of an O and an I. The mottling on the side, like the other two planes, was done by hand with my airbrush, and this Me-109 has four different colours of mottling.
Here's a link to the full album for all three models
The instrument panel is on the left, and the cockpit is the one on the left:
German July - Focke-Wulf FW-190D-11
Monday, 29 July 2024 14:24For July, I decided to tackle three model aircraft simultaneously, the idea being that they are in similar colours, so I can do them in a sort of production line. That worked pretty well.
This one is a Focke-Wulf Fw-190D-11. It was one of the last Fw-190 models, and was fast and heavily armed. This particular one was from the JV44 "Papagei" (parrot) squadron, used in 1945 to protect the Me-262 jet fighters at their most vulnerable, at take-off and landing. Because of this, the underside was painted in red and white so that anti-aircraft gunners could distinguish them easily.
The model is a Revell 1/48 kit, and was a pretty decent kit except for a massive gap between fuselage and wing which I had to fill.
Here's a link to the full album for all three models


Here are the instrument panel and cockpit (right-hand panel, centre cockpit):


This one is a Focke-Wulf Fw-190D-11. It was one of the last Fw-190 models, and was fast and heavily armed. This particular one was from the JV44 "Papagei" (parrot) squadron, used in 1945 to protect the Me-262 jet fighters at their most vulnerable, at take-off and landing. Because of this, the underside was painted in red and white so that anti-aircraft gunners could distinguish them easily.
The model is a Revell 1/48 kit, and was a pretty decent kit except for a massive gap between fuselage and wing which I had to fill.
Here's a link to the full album for all three models
Here are the instrument panel and cockpit (right-hand panel, centre cockpit):
Sea Vixen FAW.1
Full album


The Sea Vixen was a 1960s Royal Navy all-weather fighter. Pretty, but dangerous to the crews; a lot crashed. The radar operator sat in a "coal hole" with no forward view.
This is a 1/72 MPM kit. The kit had poor fit (butt-joined wings and books, ick), but there were some decent resin parts (including very undersized seats). The best bit was having pre-cut masks for the canopies. The decals on top were a challenge - lots of mostly-clear decals that could not show any silvering or they'd look awful. I got them right, luckily
Full album
Edgely Optica
Monday, 1 July 2024 15:39I finished my Edgely Optica model kit. The Optica was a weird 1970s British plane made to replace helicopters (no helicopter licence required), but it was too fast compared to a chopper. Each of the aircraft made was unique, so this particular one was yellow, with white interior, blue floor, and pinstripe seats.
Full album


The kit is a 1/72 Sharkit resin kit, and pretty horrible. I had to pin lots of parts, sand and fill everything, and detail and fit was rather poor generally. The vacuform canopy had to be cut roughly to fit; I just clipped it on, and it looks OK like that. I also just stuck the front section into the fan enclosure, no gluing; it makes it easy to transport.
I also made the base, with road, pre-bought grass, hedges, and some airbrushing for colour variation.
Full album
Lufthansa Concorde
Friday, 5 April 2024 10:22Another one I finished was the Heller 1/125 Concorde. A reasonable kit for the time, it did need a lot of filling at the wing roots. I finished it in what-if Lufthansa colours, and it looks very smart like that. The Concorde was actually one of the most extraordinary aircraft ever made; I think one may hold a round-the-world record of 27 hours, and could not be intercepted even by jet fighters. It was also a big plane - it's something like 20 or 25% longer than a B-52, longer than a 747, and a bit shorter than the A380. One little quirk I discovered when I was doing decals is that the plane is not quite symmetrical: when I was putting the Lufthansa decals on the tail, I discovered there are runner strakes at different heights, so the Lufthansa logo is high on one side, and low on the other.
Full build album for the Concorde


Full build album for the Concorde
I finished the 1/72 Airfix Fairy Rotodyne last week. The kit itself is from a 1970s moulding, so I sanded lots of rivets off, and lots of putty and sanding were needed. I had some Lufthansa decals from a 727, so I did the markings as if it had been in Lufthansa service in the 1970s.
The Rotodyne was really interesting. It was a 1950s gyrocopter. The rotor was powered at take-off and landing by exhaust gas from the two Napier Eland turboprops being piped through the rotor tips. Once in the air, the rotor would freewheel, and the turboprops would power it on stubby wings. They had something like 350 test flights, carrying a thousand passengers, without a single problem. The only hassle was that it was a bit noisy (a problem for inner-city use), but they had measures to reduce that. It never went into production.
I used Mr Color paints, primary white, aluminium (what an amazing paint to airbrush), and Gundam Blue, which was the closest I could find to the Lufthansa Blue. The decals were sadly very yellowed and thick, so not great. :( I detailed the entrance to the cabin area, including a galley, first aid kit, jump seats, and a shelf with a log book. The decals for the instrument panel turned to dust, so I created an instrument panel by drilling the instruments on plasticard. I used painted elastic for the curtain to the cabin, and for the side windows. I did do some detailing in the cargo area, but had a superglue accident with the clamshell door hinges, so I glued the doors shut.
Here's a full build album

Here's a full build album
Fairey Fulmar
Monday, 4 March 2024 14:03Last week, before the monthly model club meeting, I finished my Fairey Fulmar model kit, an MPM 1/48 Fairey Fulmar Mk.1. The Fulmar was a two-seat long-range naval fighter used by the Fleet air Arm in world War 2, and it was the highest-scoring FAA fighter of the war. It was a so-so model kit - fit was reasonable, but it wasn't always clear where parts fitted. Detail wasn't bad at all. The cockpit detail was pretty awesome - there was an entire sprue for cockpit parts.
I screwed up right at the end, when I was gluing the last few pieces on. I managed to open the superglue bottle too sharply, and several superglue drops splattered across the top. Not much that could be done about it apart from matt-coating them so they don't stand out too much.
Here's a link to the album with start to finish pictures


I thought the weathering and black-basing effects came out really well on the bottom.


Kat found me some fine threat for the aerials, and I actually used a tiny drill bit to drill the holes that I glued the aerials into at several points.

This is a pic of all the interior parts before I put it together.

The pilot's instrument panel.

I screwed up right at the end, when I was gluing the last few pieces on. I managed to open the superglue bottle too sharply, and several superglue drops splattered across the top. Not much that could be done about it apart from matt-coating them so they don't stand out too much.
Here's a link to the album with start to finish pictures
I thought the weathering and black-basing effects came out really well on the bottom.
Kat found me some fine threat for the aerials, and I actually used a tiny drill bit to drill the holes that I glued the aerials into at several points.
This is a pic of all the interior parts before I put it together.
The pilot's instrument panel.
Westland Wyvern
Monday, 29 January 2024 16:10On Friday I finished my other model kit, the Classic Airframes 1/48 scale Westland Wyvern. The Westland Wyvern was a huge (bigger than many modern jets) turboprop-powered plane with a Rolls-Royce Python engine. I have nicknamed this one "Rudolf". This aircraft few off the Royal Navy carrier HMS Eagle during the Suez Crisis in 1956.
The Classic Airframes model was pretty horrible. Fit of parts was bad, there was a lot of flash on the parts, no locating pits for most parts, and some neat-looking resin parts that had to be cut down to fit. I knocked to many parts off repeatedly. The rockets were a nightmare, as were the propeller blades; all 8 of the counter-rotating blades had to be superglued in place because they didn't have proper sockets to fit into.
Here's a link to the album if you want to see a start to finish of this and my other model, the Sea Fury
Here are some pics of Rudolf.


In this pic and the one below you can see the effect of black-basing, the deliberate effect of the unevenness of the paint finish so that it looks more realistic.


Here's the cockpit, as seen from the front. The yellow strips on the ejection handle are painted by hand, of course.

Here are the Wyvern, Sea Fury, and Seafire next to each other.

The Classic Airframes model was pretty horrible. Fit of parts was bad, there was a lot of flash on the parts, no locating pits for most parts, and some neat-looking resin parts that had to be cut down to fit. I knocked to many parts off repeatedly. The rockets were a nightmare, as were the propeller blades; all 8 of the counter-rotating blades had to be superglued in place because they didn't have proper sockets to fit into.
Here's a link to the album if you want to see a start to finish of this and my other model, the Sea Fury
Here are some pics of Rudolf.
In this pic and the one below you can see the effect of black-basing, the deliberate effect of the unevenness of the paint finish so that it looks more realistic.
Here's the cockpit, as seen from the front. The yellow strips on the ejection handle are painted by hand, of course.
Here are the Wyvern, Sea Fury, and Seafire next to each other.
Hawker Sea Fury
Monday, 29 January 2024 15:33On Friday I finished up my Airfix 1/48 scale Hawker Sea Fury FB.11 model kit. The Sea Fury was perhaps the pinnacle of piston-engined fighter aircraft, and was used as a fighter-bomber by the Royal Navy during the Korean War. This particular aircraft was flown off the Royal Navy carrier HMS Glory in 1950.
Here's a link to the album if you want to see a start to finish of this and my other model, the Wyvern.
The Airfix kit was amazing. Perfect fit, the instructions were a work of art, and generally good design.
For the paints, I used Mr Color lacquers for all the airbrushing (the main colours are Dark Sea Grey and Sky, with a black finishing primer and mottled Deck Tan to give the surfaces a slightly uneven look). Brush painting was done with Humbrol enamels; that's mostly things like the seatbelts, instruments and dials, wheels, and little touch-ups. The Mr Color lacquer paints go on beautifully, dry very quickly (I can do four coats in the same airbrushing session), and are extremely durable; they don't leave marks when masking tape is used. Once everything is mostly assembled and painted, I use a Mr Color gloss clearcoat and apply decals, using decal softening solution which gets the decals to shape around panel lines properly. Then more clear coat, and then I do weathering; that's stuff like the panel lines (which I do with a black enamel panel line paint), exhaust and gun marks (I use Tamiya weathering powder, which is like eye shadow) after studying pics of the real aircraft to see when the exhaust leaves soot. After than, I use a clear matt coat which finishes it all off.
Here are some pics of this Bristol Centaurus-powered beast.


Here you can see the rockets on the wings. Each of these 12 rockets has 6 decals on it, with a total of 72 decals on the rockets alone. One is a red strip which needs to be wrapped around neatly, and four are little white dots 1mm in size. I spent hours on the decals. If you're interested, on the underside of the wing you're looking at, including the rocket decals, there are 44 decals: two faint light circles, then the British roundel, then some text on the left, two tiny bits of text above the "W", the WJ2 marking, the red dot in the circle, and the 36 decals on the rockets.

While I was building these models, I also made some flight decks. I bought a couple of cheap picture frames, and glued two different grades of fine sandpaper to the hardwood backing in the frame. I airbrushed it with black and grey, used some brownish weathering powder, airbrushed a white runway marking, and used dilute black paint to make oil stains. Came out quite well, I think.

Here are my last three kits on my picture-frame flight decks: the Seafire, Sea Fury, and the Wyvern.

Here's a link to the album if you want to see a start to finish of this and my other model, the Wyvern.
The Airfix kit was amazing. Perfect fit, the instructions were a work of art, and generally good design.
For the paints, I used Mr Color lacquers for all the airbrushing (the main colours are Dark Sea Grey and Sky, with a black finishing primer and mottled Deck Tan to give the surfaces a slightly uneven look). Brush painting was done with Humbrol enamels; that's mostly things like the seatbelts, instruments and dials, wheels, and little touch-ups. The Mr Color lacquer paints go on beautifully, dry very quickly (I can do four coats in the same airbrushing session), and are extremely durable; they don't leave marks when masking tape is used. Once everything is mostly assembled and painted, I use a Mr Color gloss clearcoat and apply decals, using decal softening solution which gets the decals to shape around panel lines properly. Then more clear coat, and then I do weathering; that's stuff like the panel lines (which I do with a black enamel panel line paint), exhaust and gun marks (I use Tamiya weathering powder, which is like eye shadow) after studying pics of the real aircraft to see when the exhaust leaves soot. After than, I use a clear matt coat which finishes it all off.
Here are some pics of this Bristol Centaurus-powered beast.
Here you can see the rockets on the wings. Each of these 12 rockets has 6 decals on it, with a total of 72 decals on the rockets alone. One is a red strip which needs to be wrapped around neatly, and four are little white dots 1mm in size. I spent hours on the decals. If you're interested, on the underside of the wing you're looking at, including the rocket decals, there are 44 decals: two faint light circles, then the British roundel, then some text on the left, two tiny bits of text above the "W", the WJ2 marking, the red dot in the circle, and the 36 decals on the rockets.
While I was building these models, I also made some flight decks. I bought a couple of cheap picture frames, and glued two different grades of fine sandpaper to the hardwood backing in the frame. I airbrushed it with black and grey, used some brownish weathering powder, airbrushed a white runway marking, and used dilute black paint to make oil stains. Came out quite well, I think.
Here are my last three kits on my picture-frame flight decks: the Seafire, Sea Fury, and the Wyvern.
Just in time for the model club's Model of the Year show, I finished my model of the Airfix 1/48 scale Supermarine Seafire FR.47. The aircraft itself was the very last of the legendary Spitfire line, and powered by the huge Rolls-Royce Griffon engine, served in the Korean War with the Royal Navy. Only one was shot down...by an American B-29 bomber.
I learnt a few techniques while building this, including better filling and sanding using Mr Putty, and washes with enamel paints. The kit itself was pretty decent, though the decals were slightly out of register. That said, for decal that must have been more than 20 years old, they were strong and durable; even the fine lines didn't fragment.
My next model is a similar-era Hawker Sea Fury, then the Westland Wyvern, from slightly later, and then the Fairy Fulmar, WW2 Fleet Air Arm aircraft.
Here are some pics


It looks quite brutal next to the early model Spitfire Mk VIII.

I learnt a few techniques while building this, including better filling and sanding using Mr Putty, and washes with enamel paints. The kit itself was pretty decent, though the decals were slightly out of register. That said, for decal that must have been more than 20 years old, they were strong and durable; even the fine lines didn't fragment.
My next model is a similar-era Hawker Sea Fury, then the Westland Wyvern, from slightly later, and then the Fairy Fulmar, WW2 Fleet Air Arm aircraft.
Here are some pics
It looks quite brutal next to the early model Spitfire Mk VIII.
I have managed to finish two models, and took them along to the GRSM club for display.

First was the B-58 Hustler, which I did in the South East Asian camouflage scheme, basically Vietnam era. The B-58 was never used in Vietnam, but there was a Project Bullseye to evaluate it, and people who claimed to have seen it in the camouflage instead of its usual bare metal.
It was actually an extraordinary aircraft. Not large as bombers go, it was delta-winged, and extraordinary fast. It set many speed and altitude records, some of which still stand today, like the longest supersonic flight: London to Tokyo (12900km) in 8 hours 37 minutes; the last hour was subsonic due to an afterburner problem. Several in-flight refuellings along the way. It could not carry a huge bomb load like the B-52 though; it was designed to drop nuclear bombs. Also, it was maintenance-heavy, and apparently rough for pilots on long flights; they sat in fighter-style seats (so no moving around), it was so noisy they communicated with a pulley system with clip-on notes, and after long flights, they often had to be lifted out of the cockpit.
My build was OK, but I ended up with some rough paint on the top due to paint drying too quickly quile airbrushing. I was very happy with the bottom though.


Next was the Leduc 022. The kit was terrible - lots of flash, poorly fitting parts, lots of gap-filler need, no decals or markings, and it fitted together fairly well. The aircraft was an experimental ramjet with turbojet to get it to speed until the ramjet could take over. For something from 1956, it really looked like something out of sci-fi. The all-glass cockpit was inside the nose cone!


Here are links to the albums with all build pictures:
B-58
Leduc
Next models I'm busy with are a Lear Fan (a propeller-driven business aircraft), and a Concorde, which I'll do in fictional Lufthansa livery.
I managed to re-do my display shelves, and added some LED strip lights so the models are actually visible:

First was the B-58 Hustler, which I did in the South East Asian camouflage scheme, basically Vietnam era. The B-58 was never used in Vietnam, but there was a Project Bullseye to evaluate it, and people who claimed to have seen it in the camouflage instead of its usual bare metal.
It was actually an extraordinary aircraft. Not large as bombers go, it was delta-winged, and extraordinary fast. It set many speed and altitude records, some of which still stand today, like the longest supersonic flight: London to Tokyo (12900km) in 8 hours 37 minutes; the last hour was subsonic due to an afterburner problem. Several in-flight refuellings along the way. It could not carry a huge bomb load like the B-52 though; it was designed to drop nuclear bombs. Also, it was maintenance-heavy, and apparently rough for pilots on long flights; they sat in fighter-style seats (so no moving around), it was so noisy they communicated with a pulley system with clip-on notes, and after long flights, they often had to be lifted out of the cockpit.
My build was OK, but I ended up with some rough paint on the top due to paint drying too quickly quile airbrushing. I was very happy with the bottom though.
Next was the Leduc 022. The kit was terrible - lots of flash, poorly fitting parts, lots of gap-filler need, no decals or markings, and it fitted together fairly well. The aircraft was an experimental ramjet with turbojet to get it to speed until the ramjet could take over. For something from 1956, it really looked like something out of sci-fi. The all-glass cockpit was inside the nose cone!
Here are links to the albums with all build pictures:
B-58
Leduc
Next models I'm busy with are a Lear Fan (a propeller-driven business aircraft), and a Concorde, which I'll do in fictional Lufthansa livery.
I managed to re-do my display shelves, and added some LED strip lights so the models are actually visible:
2021 in numbers
Wednesday, 5 January 2022 13:17Some numbers for 2021, nicked from my Twitter post:
1801km run/walked in 360 activities
21507m in elevation climbed during runs and walks
10986km driven in my car (yay for WFH)
130 books read (roughly)
32 D&D sessions DMed virtually
10 Parkruns run
32 D&D sessions DMed virtually
10 Parkruns run
11 races run (and 3 twice)
2 model aircraft built
1 new pet (Abby)
2 Covid vaccinations
1 case of Covid
I realised that for some reason I never posted about the other model kit I finished in 2021, in October: an Italeri SEPECAT Jaguar T.2. It's the model kit of the 2-seat trainer version of the Anglo-French attack aircraft of the 1970s. It was a bit of a fiddly kit, with lots of small parts. I did it in the RAF Dark Grey camouflage; in scale, I think I should have made it lighter, as its a bit dark. Here are some pics.


Focke Wulf
Monday, 5 July 2021 14:56I'm still plodding along on my Fw-190S model, not enjoying it because of the poor fit quality. Next week I airbrush it, and I'll try a technique called black-basing. I still need to see if I want the canopies open; it would be nice, but it's finicky.
Next kit I will do will be a Sepecat Jaguar T.2 trainer. Looks like a nice kit.
D&D Foundry and models
Wednesday, 25 November 2020 15:38D&D is going very well (with the Monday group, at any rate!). We've been running on Foundry VTT for remote gaming. I downloaded a town for Foundry, complete with various buildings all set up, and I fleshed out the plot suggestions with townsfolk, creatures, plots, etc. It a lot of prep work, but very enjoyable. Foundry is a really amazing system, and getting better all the time. It's only been available for about 8 months.
Here's what my workstation setup looks like when we're gaming:
My centre screen is running the Foundry server, where I run everything from. I can control lighting, sound effects, movement, etc. etc. The left screen is connected via the web client, logged in as the group's NPC. That way, I can control the NPC separately, and see his point of view for lighting - though a new update in Foundry lets me do that from the server. The NPC is a cleric, nicknamed "Friar Fuck"; he was expelled from the monastery, oops. The right screen has OneNote, where I type up the campaign journals (and I transfer them to the jounals in Foundry too, for players to read). On that screen is also WhatsApp web client, and somewhere in the background is my web browser connected to jitsi, which we use for voice chat.
For my model-building, things are going slowly. I'm busy with a 1/48 scale Focke Wulf Fw-190S trainer. The base kit is poorly moulded, but it comes with resin and photoetched metal parts, which have incredible detail. It's interesting getting to grips with those.
Here's the rear instrument panel:
This is less than 1cm tall, and it will be largely hidden when in the plane. *sigh*
Leave, models
Monday, 21 September 2020 21:49I took leave last week, but basically relaxed at home and got a few things done. No work for a week was nice!
I did finally finish my RAF transporter and Tomahawk model kits, and here they are. Cole crane, RAF Queen Mary trailer with lorry, Curtiss Tomahawk plane with wing removed for transport, a military policeman and two motorcycle riders.


![]()
![]()
![]()
![]()
![]()
![]()
![]()
![]()
![]()
![]()
![]()
![]()
![]()
![]()
![]()
![]()
![]()
![]()
![]()
![]()
![]()
![]()
![]()
![]()
Next on the list is a 1/48 scale Focke Wulf Fw-190S-8, a two-seat trainer. The kit plastic is terrible, but it has resin and laser-cut metal parts, so it'll be a new experience.
It loos like we'll be able to go back to the War Museum for the model club meetings, as long as there are only 50 of us, so I can take my models along on Saturday.
![]()
![]()
I did finally finish my RAF transporter and Tomahawk model kits, and here they are. Cole crane, RAF Queen Mary trailer with lorry, Curtiss Tomahawk plane with wing removed for transport, a military policeman and two motorcycle riders.


Next on the list is a 1/48 scale Focke Wulf Fw-190S-8, a two-seat trainer. The kit plastic is terrible, but it has resin and laser-cut metal parts, so it'll be a new experience.
It loos like we'll be able to go back to the War Museum for the model club meetings, as long as there are only 50 of us, so I can take my models along on Saturday.